Pentagon strategy
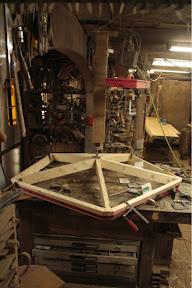
The pentagon set in the dome structure is smaller and consequently more demanding in terms of joint accuracy. I used an air nailer to tack the parts together with a spacer under the center to hold up the spokes. Then I ran the strap of a ratcheting tie down around the rim attaching hand clamps at the corners to stop the strap from sliding off. With tension applied around the rim I needed to push down the center, so I used a length of wood with a small jack braced against the ceiling of the shop to do that. Once all that was done I screwed the thing together.
While searching for assembly hints online I ran across a projection of a similar dome from a different angle. This turned out to be a hint for me, I realised I needed to ignore the hexagons and make up an irregular panel with the pentagon at the base, this type of panel should allow me to assemble the whole thing without too much suffering.

This is still at the wrong angle, it needs to fall a little more towards the center. It was encouraging to build this and see the angles left at the corners. The pentagon at the foot is a regular shape, but the hexagon at the top is irregular with the bottom third shared with the pentagon and the top four segments actually belonging to another two regular hexagons. I was just able to make up and carry this panel in the shop and there is just enough space outside the shop to store the panels out of the rain. The strategy for clamping up the irregular hexagon parts added on to the pentagon was similar, but required no push down on the center. The far end of the truck tie down is attached at a similar point, just hook onto itself, the near end is hooked on to the clamp with the yellow handle. He chair is performing a valuable role holding up the pentagon at an approximate angle for the other parts to match up.

posted by Steve at 4:09 AM
![]()


<< Home