Thursday, March 26, 2015

Woodworks

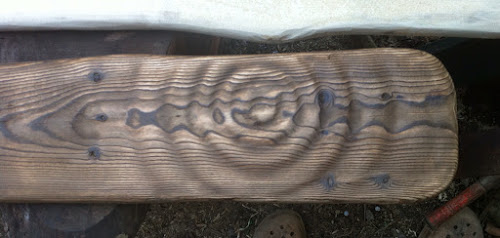
Water ripple sanded
Top rail for stairway

I have recently taken to doing searches on Pinterest rather than google, there seems to be a feathering out of results which includes items I would not have thought of. Some of the time it is random pictures of cute kittens, which are sometimes amusing, but a recent search brought up images of wood surfaces carved by a CNC machine working off of some kind of algorithm. The watery effect was pretty nifty, so I thought I would impose something similar on this top rail for a soon to be built house. I don't have the technology to do CNC, but I do have a small belt sander, which I am quite friendly with. Initially I was just going to have the corner block rippled, but I couldn't stop and drew out more ripples onto the rail and had at it. The wood was then scorched and brushed back to enhance the grain. I will stain and polish next, even the raw finish is pretty effective. I may have to study a few ripple box images and work on expanding the idea to include more reactivity.


Wednesday, March 11, 2015

Learning

I must apologise for the varied quality of pics, I have yet to master the hidden activities of these apps. Trying blogsy now as a possible ipad solution.
Here is a section of the tree motif. I think I was a little too concerned with the physical relief of shapes when I started out, trying to obtain layers of depth in the glass. That is reflected in the upper levels of each blob of foliage and branch. I wanted to give some sense of looking up into the organism, and I think the thing was saved by the flatter areas of 'tone' in the lower areas of each blob, especially where the larger branches cross through these. I would like to follow up more on the use of those tonal distinctions, which basically involve spraying loosely over the area on repeated passes and observing the result each time by lifting the visor on the helmet. The deeper relief areas start with the deepest, creating an edge where the mask is lifted out and then working back in, the next section back is then lifted out and an edge put in while the blasting is less vigorous as one nears the now naked edge created by the previous blast. I also used mini masks here to put in leaf like motifs as well as cutting a few leaf like shapes out and driving those in deep before removing a main patch of mask.
I confess I did enjoy the challenge of layers where the branches got crissy crossy and nearly messed up a couple of times, it is just about doable to remask over areas already blasted, but the edges will get mixed and if you are fussy you won't like it much.


The corner motifs were basically all about making a relief, I did use a mini grinder to put in some vein detail and other little assists where blasting would not do.


Tuesday, March 10, 2015

Mini mask

 
In the end I experimented with some pieces of rubber mat with grass leaf patterns cut into the edge and found that the marks made with the nozzle held close and the mask held tight to the glass were OK. So after blasting in a kind of stepping stone path cut from the original masking tape I stripped off most of the masking and proceeded to put in the last section with a series of these mini masks giving a repeated grassy motif. I learnt a lot during the process with this piece, but I think I would like to do something a bit looser next time and see if a little freedom will teach me some more having got the equipment sorted out a little better than before. The glass sheet is 80x185cm. Looking forward to seeing it in its final location I was disappointed when I took it to the site to find that the wall it was going into hadn't been built yet. So it is in a corner hidden behind a sheet of plaster board until that happens.


Masking

I have sidelined other work to focus on a sandblasting project.
I started by building a big hopper for sand and a rack to support the work, then draping some polythene sheets around and fitting up an extractor fan. I hooked a helmet up with an airline to keep the dust out and otherwise wore a certain amount of protection.
The difficulty with these processes is the masking, it has to hold in place and has to be fairly painless to get off. But however painless it is a major hinderance to understanding how things will look when it is gone. Anyway, this is the piece so far with masking still on. I needed to see it out of its crèche to think about the final area around the roots of the tree.
It is usual to view blasted glass from the non blasted side, so the characters here have been traced through onto the back so that I can blast them from the other side.