Monday, May 28, 2012

Bricks


We bought in some floor bricks and I spent a couple of evening sessions laying the edges on the right here, then on Sunday and today we put in the rest. Still a gap here and there, but a lot more homely with a floor to walk on and there is a lot brighter feel to the space. The trestle table is a temporary addition which we hope to use for a lacquering job. The dome seems to have the ideal qualities for lacquer drying, high humidity and warm temperatures.
The door frame is now set up temporarily at one end of the shop to check how it looks so that I can make some adjustments before I apply the copper cladding. Not a representative picture through the lens yet, so I will hold fire on posting until I have one.

Sunday, May 20, 2012

Tired


I should be striding on with the greenhouse work, but the energy level only allowed me to do fiddly work on the door. I popped out and took a couple of shots with a fisheye lens. The shot above shows most of the interior. Yesterday we put in drains and water pipes with the hope of feeding hot water from a solar heated panel on the roof and also supplying water to a small tub in the central island. The hot water tank to be is behind the brick arch, that should allow it to cool off in the winter by shedding it's heat into the house. At bottom left there is one low bed ready to take seedlings. As you can see in the mornings the windows are shut, both bottom right and in the pentagon up top.

This one shows the pattern of plastic looking straight up, the frosted stuff eliminates sharp shadows and diffused the light quite well. Still lots to do, but we are getting close to having a usable space. I think I will have to buy in some bricks to pave the areas where we will be walking and where there will be no beds. Wondering if the lethargy may be to do with the impending eclipse we are due to experience tomorrow. Hoping for the clouds to give us a miss, but the early morning timing may mean we don't get to see the show to full effect.

Thursday, May 17, 2012

Auto vents


Working away at the door now, but earlier in the week the Baylis auto vents arrived, so I couldn't resist getting up early to fit them the next day having put them in the fridge and whatnot as prescribed in the instructions. There are two on the top pentagon and two on some smaller aluminium framed windows at the rim of the dome. They seem to work fine, but I had to do a little trimming on one window to get it to shut smoothly. This is about as open as they get at midday and they seem to be fully shut by about an hour after dusk.
I went back to the Japanese site offering American imports to check what my actual price ratio was including shipping and I got four for the price of one and a third even with DHL shipping prices.
I decided to make the windows on top as separate units with a frame surround and a pane of glass held in a rebated wood frame, that meant the compound angles on the actual opening could be ignored and I could just make everything on the ground and then screw it in place up top.

As this photo shows, that makes the windows just slightly raised above the rest of the dome shell.
The door work is progressing and I am on schedule to go and fit the frame at the beginning of June.

Friday, May 11, 2012

Cumbersome


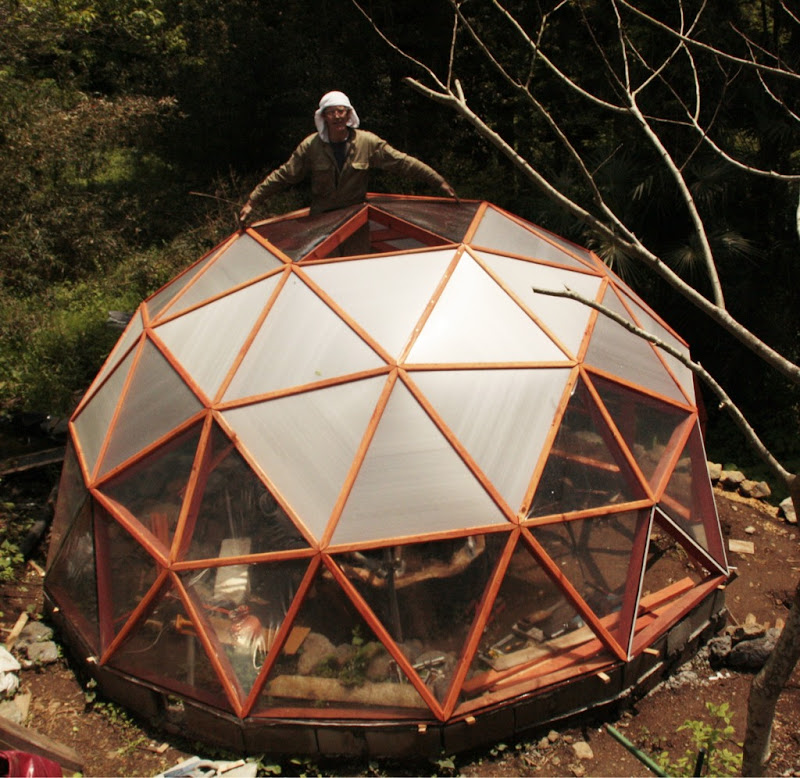
The Victorian crinolines shaping up. I took a quick break from door frame construction before lunch to assemble a little platform tower in the greenhouse so that I can work on the opening windows at the top. Still twelve triangles in need of covers not including the two panels that will open, and no door assembly to speak of. I looked for a supplier of window openers here in Japan, but as usual ridiculous prices put me off. I have ordered four from a company called Baylis in the UK. Something like four for the price of one at today's exchange rates.
If you happen be in the process of applying polythene or some other film to a similar structure allow me to expound a little on my findings. I bought seven 20m rolls of butyl tape 30mm wide and on the stiff corrugated panels I put a length of tape down the center of the spars and placed the cut panels, then covered the joint with another length of tape. I left the waxy cover strip on the tape to stop the furing strips from sticking to the joint cover tape, I should have thought to buy single sided tape for that job. We cut the polythene into triangles just larger than the size required. We applied the length of tape as before, but cut the backing strip down the center of the strip once it was in place and pealed away just enough of the backing to reveal the three corners of one triangular hole. After a few tries at that we also slit the backing tape about half way along and peeled back a patch at the center of each side. This allows you to stick the polythene at each corner and then at the center of each side after applying a little tension each time. Then you peel away each of the remaining strips while holding the polythene away from the tape and apply very slight tension before pressing those portions onto the sticky stuff.
You can see a White border around the bottom right triangle here, that is the backing strip on the half of the tape that hasn't yet been peeled off to attach any film. If you have another triangle to apply next door trim the excess polythene before preparing the other half of the strip of tape, or it will stick down and prevent the neighbour from getting to it's side of the tape.
Of course you could also use a lot of strips of narrower tape, etc, but this method was pretty economical on tape usage. And cutting the triangular shapes gives a pretty clean result especially with the thicker film we used.
I guess I will take a photo or two of that when I do the rest of the pieces.

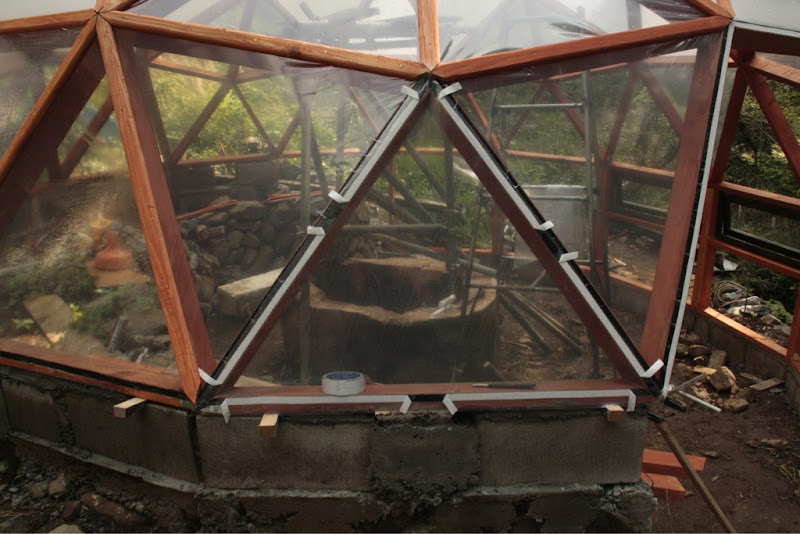
There you go, this shows the polythene pressed on at the six points where the tape is exposed. Of course all this would be better if done from the bottom up in order to promote water shedding, but that would have meant some weird scaffolding design to avoid climbing on the dome. It is best not to try and stretch too much as it just causes a build up of wrinkles somewhere. If you have to rip the sheet off where there is something unsightly the band aid technique works best, just tug it of briskly and the butyl will give up it's grip on short sections without too much grudging. Trying to pull the stuff off gradually causes it to grab on like a limpet.

Tuesday, May 08, 2012

7:7


One of those days working from seven to seven. We didn't manage to completely cover the dome, but made a damn good effort at it. All the hexagons have some kind of extruded polypropylene panels. I imagine these will suffer from uv exposure, but they were pretty cheap, so I wanted to give them a try. The top pentagon has some transparent stuff I was given and the remainder around the base is a mix of thin polythene sheet types. I wanted to keep the woody look on the outside too, so I made a whole batch of furing strips cut without compound angles. This was doable on my small chop saw using it in an improper manner. I attached a sub base so that I could place the workpiece on the saw at right angles to it's normal attitude. We also rounded all the edges on the strips, which marked the end of a seven to eight day at the weekend.
The interior is now much more defined and there are certain strange qualities about it even with several faces still not covered. Odd acoustics that will hopefully disappear when there are some plants in there.

Monday, May 07, 2012

Descaffinated


Spent the day mainly on the door frame, but popped out to remove the scaffolding after five. I may erect another tower in the middle to support a platform for the covering work, but it does not seem too difficult to climb about on and a few clamps to make a bracket shelf to support the panels waiting to go in may be all that I need. A friend is coming to visit tomorrow, so if the weather is good I might take some time off other work and do some covering before they arrive.

Sunday, May 06, 2012

High low


We didn't get quite as far as I had hoped over the weekend. Preparations for the covering took longer than I thought and the weather was too intermittent to allow a confident attack on the job of applying some plastic. Some high pressure area in the south causing turmoil as it tries to shift the low pressure lying on top of us. Fearsome storms about the place and then back to spring again.
We got the foundation in for the wall around the south side and put in the basic timber structure for that. This is a view from the opposite side to those seen before. It gives a view of the veranda from whence I normally push the shutter button and shows something of the nature of the structure on the eastern shore of the dome.

Sammy put in some time arranging the foundation blocks and then stuffing cement in under the the wood sills after we had concreted between the blocks encasing some strategically placed steel bars. Slightly dumb doing everything backwards, but my confidence in the measurements for the dome side positions was not strong enough to make me build from the foundation up, so it has gone in from the top down.

Thursday, May 03, 2012

Conference


Not quite sure what the bench committee are discussing, but any concerns they had were justified. In the afternoon I scorched all the tops and the little shoe plates on the two that have them. They were all then branded, so any blur in this picture is caused by them shaking in fearful anticipation not me jiggling the camera.
These are the brands on the back corners, the left one is the motto of the local social welfare council "we are all good people"and their Mark. The right one is the name of the organisation with the little present logo my daughter came up with and the bottom legend basically means "a gift". The branding business actually takes quite while, each section is done separately and it takes a few shots on each one. I ran out of steam around 6:30, so they will have to wait till tomorrow to be screwed up together. I expect the team could do with the rest after all they have been through today.

Wednesday, May 02, 2012

Upcoming


We are getting a lot of rain, the inclement weather forced me to focus on sketching out a design for an upcoming project. Trying to figure out a suitable shape for the top of the door to follow the curve of a slab of chestnut. The materials are coming together and I have some deadline dates for the frame and the door itself. One other ongoing project is another three benches for the community. I have been working on shaping them and today I got the first one to a point where I could sit on it. Trying to figure out the posting configurations for the blogpress app so that the pictures are not quite so pixy.
I had no joy at all using the iPad camera, but the eyefi card I got for the larger camera is proving useful. It loads the pictures straight on to the pad and I can get them up here.
The other day I took the two benches I made previously to their final resting places along with the current head of the local community. The cherry trees were still in bloom then. A local NPO made several benches, but for some reason they were unable to continue, so I have been pressed into service as a seating manufactory. I didn't care for the labels they put on their creations. They were a kind of printed plastic slab, so I made some steel brands instead. These leave a nice deep mark in the wood when pushed in red hot. Once the charcoal is brushed away and they are polished a little they leave a pleasantly rounded impression that looks almost as if it had been carved into the wood.


Labels:

Tuesday, May 01, 2012

Beans


After erecting the preassembled panels on Saturday, Sunday saw less dramatic changes laying a fairly scrappy block foundation around the raised bed portion at the northern side of the structure. Not much room left for actual crops as we are making the dome, but a few beans planted as well as some potatoes here and there. I checked how the blocks were doing and found that the scaffolding supports were redundant, so pulled all the scaffolding out from the north side after taking this, so I will be able to fill the spaces left for those pipes next. I also filled two of the gaps where I wasn't sure of strut measurements. The angles weren't quite right, but good enough for now. All the base struts are horizontal with a tilt of 10 degrees in to the center. It would add quite a lot of extra work to the cutting procedure to allow for a completely flat base, but having built this one I think I could figure out the necessaries to build another that was flat. I actually think the tilt inward is a good thing. Every surface has some kind of angle so there is nowhere for condensation to accumulate and start causing trouble.
Sadly I now have the measurements for these struts burnt into the memory bank.
I will try and make some more specific notes on that so that I can erase them from my mind.

Labels: