Saturday, April 28, 2012

Panelling


Four of the five panels inserted. The final three I managed on my own with a little jiggery pokery. The three points where the panels all meet are obvious. I made a couple of blocks shaped to clamp under the ends of these points so that the panel could not slip down through the gap.


I was really glad I saved some of the offcuts from the angle cuts. The clamping of each corner needed angle blocks to allow the clamps to get a proper purchase.
Overall the joints look good, now there are lots of fiddly jobs to do, but the shape is pretty much there to be seen.


Labels:

Wednesday, April 25, 2012

Blurry

By the time we got done it was growing dusky, but despite the camera tremor this shot gives a better idea of the dome form and shows the orange step clamps I used to climb up and hang the chain block.


After five

Extending the weekend regimen to include hours after five. I set up to the following point on Tuesday. Beginning to erect scaffolding to support sections that need a panel wall underneath and positioning the central pentagon ready to be lifted into place.


Then today I realised I needed to add more height to the system and made some extensions to the personal torture device. This was done to allow me to attach a chain block above the central pentagon. The tricky step I undertook next. The helpful offspring left photo duty to lend a hand, so that is part of prehistory.


We could not resist trying out the segments, so we pushed on a little longer and got them set up. Hard to grasp the shape of the structure from this, but it shows the scaffolding elements at work. Supporting the bases of the two segments at the correct height and providing purchase for the chain block.


Tuesday, April 24, 2012

Lead


Embracing my apparent need for constant changes in activity I moved on to an area of the ongoing sign project that required addressing. The weighty sign will sit on a copper clad roof with spars that run down between flat sheets. The two pillow blocks here will straddle two of those spars and transfer the weight of the sign to the beams of the roof support structure below. The actual work is done by a welded structure of stainless steel with lead decoration on the front, which is all that will be visible from street level.
I made an impression of the decorative tile in the rear in sand, then adjusted the impression with the aid of a block of wood and some fiddly spoon work to remove the parts of the structure that I needed to be absent. Then poured in the molten lead.

Sunday, April 22, 2012

Indoors


Started the day with arranging foundations for the dome. Sammy started on painting the panels and got three done before rain stopped play at lunch. With the spring wet outside I decided to have a go at mating up the two remaining unpainted panels in the shop. I wanted to asses the viability of the panels and measurements from the acidome site for the extended half hexagons, which fill the gap at the bottom center here. They were actually right by the look of it. The site gives a detailed set of measurements for the dome with all the angles and strut lengths with a style of joint that google translate calls "Cone" but those leave a wavy base line and selecting the "align base" option gives an error message. So I compromised by inputting the same dimensions for a hub based design, which would allow for calculating extended parts to flatten or "align" the base. I input zero as the diameter of the hub part and used the lengths given to estimate the length of the relevant parts. I didn't have total faith, so left them a little long with one angle left uncut, so that I could do this kind of mockup and measure the actual result. I was hoping the trial assembly would happen outside, but the weather didn't permit.
The tannin based paint we are using is called kakishibu. Mixing in a little russet colored earth gives it an immediate color, but it also gradually darkens as it ages. I am trying to get away from oil based stains and preservatives as they are harsh on the lungs. In this case we will also be eating the stuff grown in the greenhouse, so I don't want it too poisonous. Sadly the persimmon brew smells a little like horse manure, but I would rather have that than the sting from formaldehyde type stuff.

Saturday, April 21, 2012

Interim


The stack of panels is now done, there are four here with the pentagon for the tippy tip of the dome standing in front. The fifth and final panel came up together after this was taken. The stacks of struts diminished correspondingly and the shelf brackets down the end sighing with relief. The tip of each of the panels will lean in to mate with one tip of the pentagon. Painting with a persimmon based tannin mix is next, then I will have to check how much plastic sheet I have for the covering. A local chap gave me a roll of stuff about 0.5mm thick, which will cover the triangles in the pentagons, but it is not wide enough to do the hexagons. I am thinking of cutting the covers for those from double walled polycarbonate stuff, so the more I can get done with the gift the better I shall like it. I must also make some openable window panels to let out some of the summer heat that I hope will acummulate.

Thursday, April 19, 2012

Meanwhile


I rarely buy timber, but the current sign making job led to a request to procure a largish slab of zelkova for a counter. None of the timber I had on hand was suitable, so I had to tour the local merchants. After finding the shelves bare at previous contacts, last friday we settled on this piece at 110000 yen, a bargain price apparently, but shocking pricey for my standards. I have spent the last two days using a variety of sanders and planes to get the thing from a rough sawn plank to a silky smooth finish. Mind numbing work, so I allow the numbed organ to drift over to the other bench and assemble dome panels as a break. I have to get this plank out the door before I do anything else or it will get dirtied up and I will have to sand it some more. The thing is scheduled to have some kind of oil finish applied at the other end of it's journey, which is going to mean a lot more care than usual during transportation as any little exposure to water causes blotchy stains. This photo was at the end of smoothing the top, but it took all of today (excluding dome making breaks) to shape up the edges.

Pentagon strategy


The pentagon set in the dome structure is smaller and consequently more demanding in terms of joint accuracy. I used an air nailer to tack the parts together with a spacer under the center to hold up the spokes. Then I ran the strap of a ratcheting tie down around the rim attaching hand clamps at the corners to stop the strap from sliding off. With tension applied around the rim I needed to push down the center, so I used a length of wood with a small jack braced against the ceiling of the shop to do that. Once all that was done I screwed the thing together.
While searching for assembly hints online I ran across a projection of a similar dome from a different angle. This turned out to be a hint for me, I realised I needed to ignore the hexagons and make up an irregular panel with the pentagon at the base, this type of panel should allow me to assemble the whole thing without too much suffering.


This is still at the wrong angle, it needs to fall a little more towards the center. It was encouraging to build this and see the angles left at the corners. The pentagon at the foot is a regular shape, but the hexagon at the top is irregular with the bottom third shared with the pentagon and the top four segments actually belonging to another two regular hexagons. I was just able to make up and carry this panel in the shop and there is just enough space outside the shop to store the panels out of the rain. The strategy for clamping up the irregular hexagon parts added on to the pentagon was similar, but required no push down on the center. The far end of the truck tie down is attached at a similar point, just hook onto itself, the near end is hooked on to the clamp with the yellow handle. He chair is performing a valuable role holding up the pentagon at an approximate angle for the other parts to match up.


Monday, April 16, 2012

Hexagon


The job I had planned for today was put off until tomorrow, so I did a blitz on cutting parts for the greenhouse. Even with ear protection on all day there is a slight hissing between the ears. I assembled one hexagon at the end of the day to try things out. When I measured the diameter across the three axes they were all within a gnats eyebrow of 1945 millimetres, and the joints are tolerably good.
Some of the vast collection of spear headed struts visible on the shelves behind in the photo above and my reams of notes on web page printouts on the stool in the one below.


Sunday, April 15, 2012

Dome works


The weekend project work is suffering due to outings and community meetings. My focus at present is on the dome greenhouse. On encouragement from my brother we even experimented with dimensions in sketchup. This seemed to indicate the measurements on the web site acidome.ru for a 3v dome with all struts cut to compound angles were pretty good. So I set up this little gauntlet of saws to feed material through. Neither can cut a 2x4 standing on it's side, so the older ryobi unit in the foreground is set up to cut shallow compound angles on the end of struts to form the dome with the timber on it's side. The hitachi sliding chop saw at the back has a lot better angle adjustment, so that is on the same run of fence to cut pieces to length and to cut either a 10degree or 12 degree angle on the ends.
I didn't get as far as I hoped today, but have cut sufficient of two types of strut to form two pentagons and a hexagon. That should tell me whether I am way off the Mark or not. There are four types of angles to cut and three types of strut not including variations to flatten out the base. Two of the strut types also have different angles at either end, so lots of chances to do the wrong thing.


The first triangle of one pentagon with a strap clamp on to assess the joint cuts. The little blocks on the table are cut to the various end angles to facilitate alignment of the radial arm saw blade. They are also marked with the type of strut and the angle to try and eliminate confusion. It looked pretty good, so I may be able to screw one of the pentagons together tomorrow.

Wednesday, April 04, 2012

Sawing


The big chainsaw gave up suddenly back in February and I set it aside to stew for a while. Finally got it out to have a proactive research session on April fools day. Having removed the carburettor I found that the end of one of the main rubber arteries had developed a fracture where it joined the nipple. Just enough slack in the tube to chop the end off and reattach it. Once back together the chap started after a few tugs on the rope.
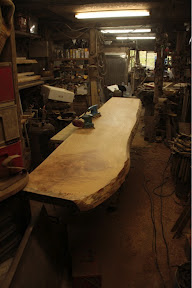
We went to pick up some cypress logs with the crane today and I gave the saw a run at one of them to make up planks for bench tops. It worked fine, but began to develop a bias to one side, so I took it in for a sharpen and I will be back on it tomorrow. The fattest log is about 47cm diameter. I run a groove along the top of the log on the line of the plank I want to cut with the small chainsaw and then dig in with chubby. The big bugger is hard to get started in a cut exactly where you want it, with a bar over a meter long it is difficult to control the teeth whizzing round the snout as they tend to slither about before digging in. The little groove provides a safe notch to sit the snout into. It is a solution for rough planks, but I must make time to work up some kind of guide for the monster.
The plan for bench making hinged on having the saw working, so I am really glad to have it back on the team.
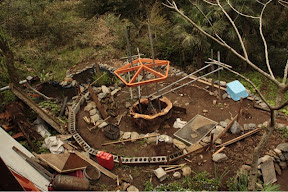
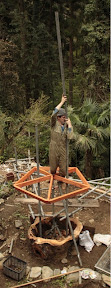
My other activity for April fool was draining and digging all the crud out of the bottom of the pond and carting it down to the upper of the two ponds we have just made. Stinky muck, but full of companions who have rights, so I hope they all made it safe into the new home. I had hoped to reline the pond, too, but I don't have time right now. I was just in time with the cleanup, the first toads showed up on the third. It should be easy enough to transfer their lines of eggs down into the bigger pond now there is nothing in the pond but water. I completely emptied the cement tub, but seepage from holes in he lining put about six inches of water into it and torrential rain filled it right up. It also washed away the remaining stinky spills where I sloshed the wheelbarrow.

Sunday, April 01, 2012

Weekending


For the past few weekends we have been working on the field area in front of the house. These pictures are from the veranda, which overlooks the area. On the far left there are two overgrown ponds. Running left to right across the middle of the photo there is a rock retaining wall about 80cm high.


We redug and expanded the ponds with new linings and gathered lots of stone from the river to extend and redesign the retaining wall. The line on the left is for a bucket on a pulley to haul rocks up. I aim to make a geodesic dome greenhouse here too, the pole defines a 5m diameter circle. The outer edge of the greenhouse is laid out with sticks and whatnot.


The ponds are more defined and the retaining wall for raised beds is a lot clearer. The pole marking the circle of the greenhouse has been modified to indicate three sides of the geodesic dome base. The blocks are laid out in a shallow trench to be at the same height as the top of the pole in the center of the circle. The center pole is held firmly in position so that the three segment pattern can be swung round to Mark out the foundations. There will be a set of glazed panels on the lower portion to form a wall for the far side of the dome base to sit on. Also a large raised bed in the center of the greenhouse. I still have some work to do on calculating the angles for all the struts to make the dome, thankfully there are a few tools for that on the web, simplydifferent.org and acidome.ru are very useful sites. We saved all the creepy crawlies from the ponds as we redug and there were very few tadpole casualties. The next customers will be the toads, everything late this year, but even so they should be here soon.