Sunday, June 07, 2015

Summer Blue Birkenstock and borrowed pyjamas

Staying with friends in London to accompany them on a weekend in Norfolk. I had a ranging day in London. A late night followed by an early start to visit the new Covent Garden flower market. As we drove to the market I was struck by how the city has become a mass of juxtapositions rather than the more themed composition, a modern Waterloo station quickly losing its function and no longer a train hive but a venue for fashion shows and such, even the New market is apparently not long for this world and will soon be overwritten. Little posters on the garden gates of a terrace of houses saying 'Say No to the Garden Bridge'. So many people in a city and a government that wants to please them all by changing very little and doing as little as possible. It is bound to result in jumble.

The nature of the day followed a similarly twisting course, I thought I had a grip on the things starting in overalls helping to repot market plants for sale in shoreditch, but the chaos of city living got the better of me. I ended up departing for Norfolk with none of the essentials that I had planned to add to the day bag before leaving. The general discombobulation is interesting.

We don't really have a vocal workforce of beggars in Japan, so there is some novelty in the occasional approach one receives in the city. One chap started with a request for £900 to finance a stay in a posh hotel, humorous, but it did not spur me to loosen the purse strings. Disappointed he fell into the distance but shouted over his shoulder in a not entirely uncomplementary tone 'Nice Birkenstocks'. This was not the first comment I had received relating to my footwear and I must confess I began to suspect a conspiracy. The sandals were actually a kind Father's Day gift and as such give me a sense of my place in the order of things.

Lovely to be out of the city now and away from the perceptible hum of humanity. I had a short walk and was struck by the profusion of white campion and surprised myself in correctly identifying a whitethroat singing off among the herbage.


Thursday, March 26, 2015

Woodworks

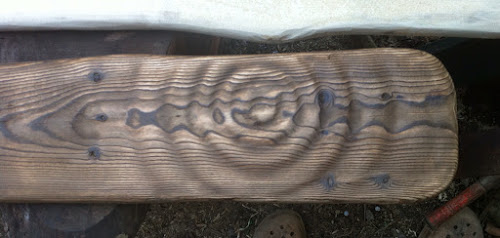
Water ripple sanded
Top rail for stairway

I have recently taken to doing searches on Pinterest rather than google, there seems to be a feathering out of results which includes items I would not have thought of. Some of the time it is random pictures of cute kittens, which are sometimes amusing, but a recent search brought up images of wood surfaces carved by a CNC machine working off of some kind of algorithm. The watery effect was pretty nifty, so I thought I would impose something similar on this top rail for a soon to be built house. I don't have the technology to do CNC, but I do have a small belt sander, which I am quite friendly with. Initially I was just going to have the corner block rippled, but I couldn't stop and drew out more ripples onto the rail and had at it. The wood was then scorched and brushed back to enhance the grain. I will stain and polish next, even the raw finish is pretty effective. I may have to study a few ripple box images and work on expanding the idea to include more reactivity.


Wednesday, March 11, 2015

Learning

I must apologise for the varied quality of pics, I have yet to master the hidden activities of these apps. Trying blogsy now as a possible ipad solution.
Here is a section of the tree motif. I think I was a little too concerned with the physical relief of shapes when I started out, trying to obtain layers of depth in the glass. That is reflected in the upper levels of each blob of foliage and branch. I wanted to give some sense of looking up into the organism, and I think the thing was saved by the flatter areas of 'tone' in the lower areas of each blob, especially where the larger branches cross through these. I would like to follow up more on the use of those tonal distinctions, which basically involve spraying loosely over the area on repeated passes and observing the result each time by lifting the visor on the helmet. The deeper relief areas start with the deepest, creating an edge where the mask is lifted out and then working back in, the next section back is then lifted out and an edge put in while the blasting is less vigorous as one nears the now naked edge created by the previous blast. I also used mini masks here to put in leaf like motifs as well as cutting a few leaf like shapes out and driving those in deep before removing a main patch of mask.
I confess I did enjoy the challenge of layers where the branches got crissy crossy and nearly messed up a couple of times, it is just about doable to remask over areas already blasted, but the edges will get mixed and if you are fussy you won't like it much.


The corner motifs were basically all about making a relief, I did use a mini grinder to put in some vein detail and other little assists where blasting would not do.


Tuesday, March 10, 2015

Mini mask

 
In the end I experimented with some pieces of rubber mat with grass leaf patterns cut into the edge and found that the marks made with the nozzle held close and the mask held tight to the glass were OK. So after blasting in a kind of stepping stone path cut from the original masking tape I stripped off most of the masking and proceeded to put in the last section with a series of these mini masks giving a repeated grassy motif. I learnt a lot during the process with this piece, but I think I would like to do something a bit looser next time and see if a little freedom will teach me some more having got the equipment sorted out a little better than before. The glass sheet is 80x185cm. Looking forward to seeing it in its final location I was disappointed when I took it to the site to find that the wall it was going into hadn't been built yet. So it is in a corner hidden behind a sheet of plaster board until that happens.


Masking

I have sidelined other work to focus on a sandblasting project.
I started by building a big hopper for sand and a rack to support the work, then draping some polythene sheets around and fitting up an extractor fan. I hooked a helmet up with an airline to keep the dust out and otherwise wore a certain amount of protection.
The difficulty with these processes is the masking, it has to hold in place and has to be fairly painless to get off. But however painless it is a major hinderance to understanding how things will look when it is gone. Anyway, this is the piece so far with masking still on. I needed to see it out of its crèche to think about the final area around the roots of the tree.
It is usual to view blasted glass from the non blasted side, so the characters here have been traced through onto the back so that I can blast them from the other side.


Thursday, January 22, 2015

Aluminium


It has been a while since I have done any lost foam casting, but a recent request for a sign got me going on a slightly upsized set of flasks for sand casting with the lost foam method. I lost track of my original intention to document the process, as I was also using the brain for constructing the equipment and time kind of ran out. The actual pouring was pretty chaotic, but in the end the piece came out OK except for the top part where the speed of flow couldn't drive out the gases from the polystyrene out quickly enough leaving voids along the ridge.
Even sketches of the process of embedding the original and all the sprues and whatnot in sand might not be sufficient to convey sufficient detail to replicate the process, so perhaps the best solution will be to have another go one day soon and video it.
There is something odd about feeding the pot in the furnace while it is blasting away to melt the aluminium and also focusing on the job of jamming the sand in that leaves the brain with very little room for any other activity.
This piece is about 55x35cm, which is just about the limit for the new set of flasks. Anyway, after fitting the problems with the top hardly notice at all thanks to the position and the lighting.


Friday, January 16, 2015

Snow barrier


I have worked through the stack of logs and that has left me free to tackle a project that has been looming. A fence designed to stop snow slipping off of a steep roof into a neighbours property. The juiciest bit for me was a curvy top rail for the fence, which is about 8m long. I noticed these two logs had a similar curve in them and sawed them to about 18cm thick along the axis closest to the shared curve. Then I used a little jig for the chainsaw to make a perpendicular cut along a curved line for the top and bottom of one beam and then traced that curve onto the matching piece. The beams taper from 18cm at the far end to about 12cm at the near end. The curve having been cut I marked out level lines onto one side of each beam. I decided that the bottom surface at the tip would be the lowest point and the underside of the beam at the center would be 240mm above that. You can see a stick tacked on to the far end of the right hand beam, I marked that at a few points and used those to snap in the level lines with an ink line. The level lines obviously allow me to measure the height of the curved beam where the pillars intersect, but they are also important to measure along and find the 2m centres for those pillars.


This is the chainsaw jig, I was worried that a normal drill would have trouble with going through the tool steel on the bar, but it worked fine, perhaps just the area around the rim of the bar is heat treated. Anyway, the bar is bolted onto the jig using two threaded inserts in the plywood.


Having drawn in the morticed for the pillars I needed to make them properly perpendicular. With the beam in the workshop underside facing up I wedged up the thin end on a block to orient the beam correctly, then with a spirit level on the morticer I was able to orient that to cut into the timber at the correct angle. I had already put in a little profile on the beam at this stage using a curved blade in a groove cutting tool that I made several years ago.


I needed a kind of fancy lap joint to mate up the two halves of the beam in the middle. I have written about a self tightening version of this joint before, but this time I used a little hardwood slat to push the joint halves tight together.
Here is the finished joint.


This shows how the little spline acts on the two halves to drive those little nose portions snugly into place.


This shows the beam and pillars erected on site from the neighbours car park. I have to go back and nail planks top and bottom to finish the fence and also fit some braces that will tie the structure to the house. Last year's heavy snow came straight off the roof and onto the wimpy metal fence knocking it off its socks, hopefully this addition will keep the snow in bounds.

Thursday, November 06, 2014

Timber


Back in the early spring just before departing for a sojourn in the UK I cut down the major portion of a wall of cedars that stood on the slope between the house and the stream. These trees have blocked a massive amount of our daily quotient of sunshine for the past 20 years and it has made a big difference to have them gone. I used some of the felled weenies to make logs that would act as spars to hold up two stacks of logs from the larger trees. Selecting trees that were well positioned on the slope I cut them a little higher than necessary to leave a stump that could be notched to make a fork that would hold the squared end of a log slotted into it. Where the slope was shallow the other end of this log rested on the ground higher up the slope, if not the other end rested in another slotted stump. This left me with the logs stacked on a kind of platform above the ground with lots of air underneath so they could dry out a little over the summer. I stripped off the bark as the logs were stacked to give the bugs fewer places to hide and aside from turning a little dark with a layer of mould they have remained sound and free of insects.
I built an extension on the roof of my scaffolding timber store shed and also laid out some scaffold pipes as joists to hold up a level platform made from shuttering panels I had used in placing the concrete for the foundation extension. I screwed two 5.5m lengths of angle iron along the sides of the panels and they form skimpy rail tracks for a frame extension on my chainsaw sliding rack to form a trolley with the notched rollers I had used on the trolley for gathering rocks from the stream bed. The chainsaw now runs on the rails instead of needing something to slide along on top of the log being sawn. I gave the thing it's first trial run on one of the logs today and it works pretty smoothly.
One other addition was an old bike fuel tank that I connected up to the chainsaw fuel line to save me having to refill the tank every couple of runs.
I can now winch cedar logs up onto the platform in turn and saw them up into lumber for the next extension to the home. I need to organise a space for the sawn lumber stack so that the timber can dry out a little more because it is still a little too heavy to shift around and work on. The 5.5m rails mean I can just clear a rip cut in a 5.10m log, but it means I have one foot braced against the wheels on the trolley to start the saw up while the trolley hangs on by the skin of its teeth at the end of the track. As you can see, the log is held in place with a few large staples knocked into it and the slats on the platform. The slats allow me to wedge up the narrow end of the log a little to get a better balance to the cut. The saw end of the mounting trolley has a screw adjuster to raise or lower the bar, but I still have to adjust the tip end by hand and measure the height each time, I guess one day I will put in another threaded rod and synchronise the two adjusters with a chain to save me this little inconvenience and I will be able to adjust the bar height parallel to the platform with the one handle. I might also make some kind of mechanism to winch the trolley along the track with a handle, it isn't a hard push to get the saw along the cut, but it means keeping a stressful pose for a few minutes each time. Twiddling a little winch handle might be a little too genteel but it would deliver less wear and tear on the body.